
0. 개요
Passport.js란?
Passport.js는 다양한 인증 방법(예: 로컬 사용자명/비밀번호, OAuth, JWT 등)에 대한 전략을 제공하여 인증을 간소화하는 인기 있는 Node.js 미들웨어입니다. Passport.js의 모듈식 아키텍처는 Express와 같은 프레임워크, 그리고 이를 기반으로 하는 NestJS와의 원활한 통합을 지원합니다.
- 모듈식 전략 통합: 다양한 인증 전략을 필요에 따라 쉽게 전환할 수 있습니다.
- 커뮤니티 및 문서 지원: 강력한 커뮤니티 지원과 잘 정리된 문서.
- NestJS와의 자연스러운 호환성: NestJS의 모듈 구조에 자연스럽게 맞아떨어집니다.
Passport는 어떻게 동작하는가?
NestJS에서 Passport는 미들웨어로 작동하며, 다양한 인증 전략을 구현하는 데 사용됩니다. 각 전략은 Passport의 Strategy 클래스를 확장하여 정의됩니다. NestJS는 이를 통해 인증 로직을 관리하며, 요청이 들어오면 AuthGuard를 이용해 설정된 인증 전략이 실행됩니다. UseGuards 데코레이터를 사용하면 해당 경로에서 Passport 전략이 활성화되어 요청의 유효성을 검사합니다.
예를 들어, AuthGuard('local')은 로컬 전략을 사용하여 사용자의 자격 증명을 검증합니다. 이 가드는 Passport가 요청 객체에 사용자 인증 정보를 추가하도록 하며, 인증 성공 시 req.user에 사용자 정보가 포함됩니다.
간단하게 말하자면 아래와 같은 흐름을 가지면서 Strategy에서 반환한 값을 Controller에서 사용이 가능합니다.
Client -> { Guard -> Strategy(Passport) } -> Controller
1. 사전 준비
Passport 사용에 필요한 라이브러리 설치.
--save 옵션은 현재 생략해도 알아서 package.json 에 의존성 추가가 됩니다.
npm install --save @nestjs/passport passport passport-local
npm install --save-dev @types/passport-local
Class 파일 생성.
# user 관련 파일 세팅
nest g mo users
nest g s users --no-spec

# auth 관련 세팅
nest g mo auth
nest g s auth --no-spec
nest g co auth --no-spec
2. 구현
구현 예시는 공식 홈페이지를 참고하였습니다.
UsersService
import { Injectable } from '@nestjs/common';

// This should be a real class/interface representing a user entity
export type User = any;

@Injectable()
export class UsersService {
  private readonly users = [
    {
      userId: 1,
      username: 'john',
      password: 'changeme',
    },
    {
      userId: 2,
      username: 'maria',
      password: 'guess',
    },
  ];

  async findOne(username: string): Promise<User | undefined> {
    console.log(`find username: ${JSON.stringify(username)}`);
    return this.users.find((user) => user.username === username);
  }
}
User의 데이터 모음(대체로 Repository 역할)에서 username 값으로 찾는 메소드를 하나 추가가 되어있습니다.
UsersModule
import { Module } from '@nestjs/common';
import { UsersService } from './users.service';

@Module({
  providers: [UsersService],
  exports: [UsersService],
})
export class UsersModule {}
AuthService
import { Injectable } from '@nestjs/common';
import { UsersService } from '../users/users.service';

@Injectable()
export class AuthService {
  constructor(private usersService: UsersService) {}

  async validateUser(username: string, pass: string): Promise<any> {
    //TODO 검증에 있어 Password 는 텍스트로 바로 저장하지 않습니다. 보안 이슈가 있기 때문에 암호화 처리는 필수!
    const user = await this.usersService.findOne(username);
    if (user && user.password === pass) {
      const { password, ...result } = user;
      return result;
    }
    return null;
  }
}
예제 상에는 비밀번호 암호화 내용이 없지만 아래 쪽에 보면 암호화 및 검증을 하라는 말이 나와있습니다.
대부분 보안 상의 이슈로 비밀번호를 일반 텍스트로 저장하는게 아닌 Hash로 암호화하기 때문에 예제 상 간단하게 구성되어 있을 뿐 암호화 및 검증 로직이 추가되어야 합니다.
LocalStrategy
import { Strategy } from 'passport-local';
import { PassportStrategy } from '@nestjs/passport';
import { Injectable, UnauthorizedException } from '@nestjs/common';
import { AuthService } from './auth.service';

@Injectable()
export class LocalStrategy extends PassportStrategy(Strategy, 'local') { // Strategy 이름 지정이 가능함.
  constructor(private authService: AuthService) {
    super();
  }

  async validate(username: string, password: string): Promise<any> {
    console.log('user validated: ', username, password);
    const user = await this.authService.validateUser(username, password);
    if (!user) {
      throw new UnauthorizedException();
    }
    console.log(`user returned: ${JSON.stringify(user)}`);
    return user;
  }
}
Passport를 활용한 로그인 검증 전략을 작성하는 Class입니다.
위에서 작성한 AuthService의 validateUser() 메서드를 사용하고 예외처리가 적용됩니다.
통과 시에는 user 객체를 반환하여 다시 조회할 필요 없이 User의 정보를 사용이 가능합니다.
PassportStrategy 상속 시, name 파라메터에 지정을 해두면 자동 설정된 이름 대신 사용이 가능합니다.
(AuthGuard() 사용 시, 확인 가능)
AuthModule
import { Module } from '@nestjs/common';
import { AuthService } from './auth.service';
import { UsersModule } from '../users/users.module';
import { LocalStrategy } from './local.strategy';
import { PassportModule } from '@nestjs/passport';
import { AuthController } from './auth.controller';

@Module({
  imports: [UsersModule, PassportModule],
  providers: [AuthService, LocalStrategy],
  controllers: [AuthController],
})
export class AuthModule {}
AuthController
import { Controller, Get, Post, Req, UseGuards } from "@nestjs/common";
import { AuthGuard } from '@nestjs/passport';
import { Request } from 'express';

@Controller('auth')
export class AuthController {
  @Get()
  test() {
    return 'test api';
  }

  @UseGuards(AuthGuard('local'))
  @Post('login')
  async login(@Req() req: Request) {
    return req.user;
  }
}
컨트롤러를 정의할 때 사용 할 Guard를 적용해 넣게 됩니다.
이때 위에서 언급하였듯이 AuthGuard('local')처럼 'local' 대신 다른 명칭을 지정해서 사용이 가능합니다.
추후 jwt, google, kakao 등 추가적은 검증을 넣는다면 해당 명칭을 임의로 지정하여 사용하게 됩니다.
3. 실행
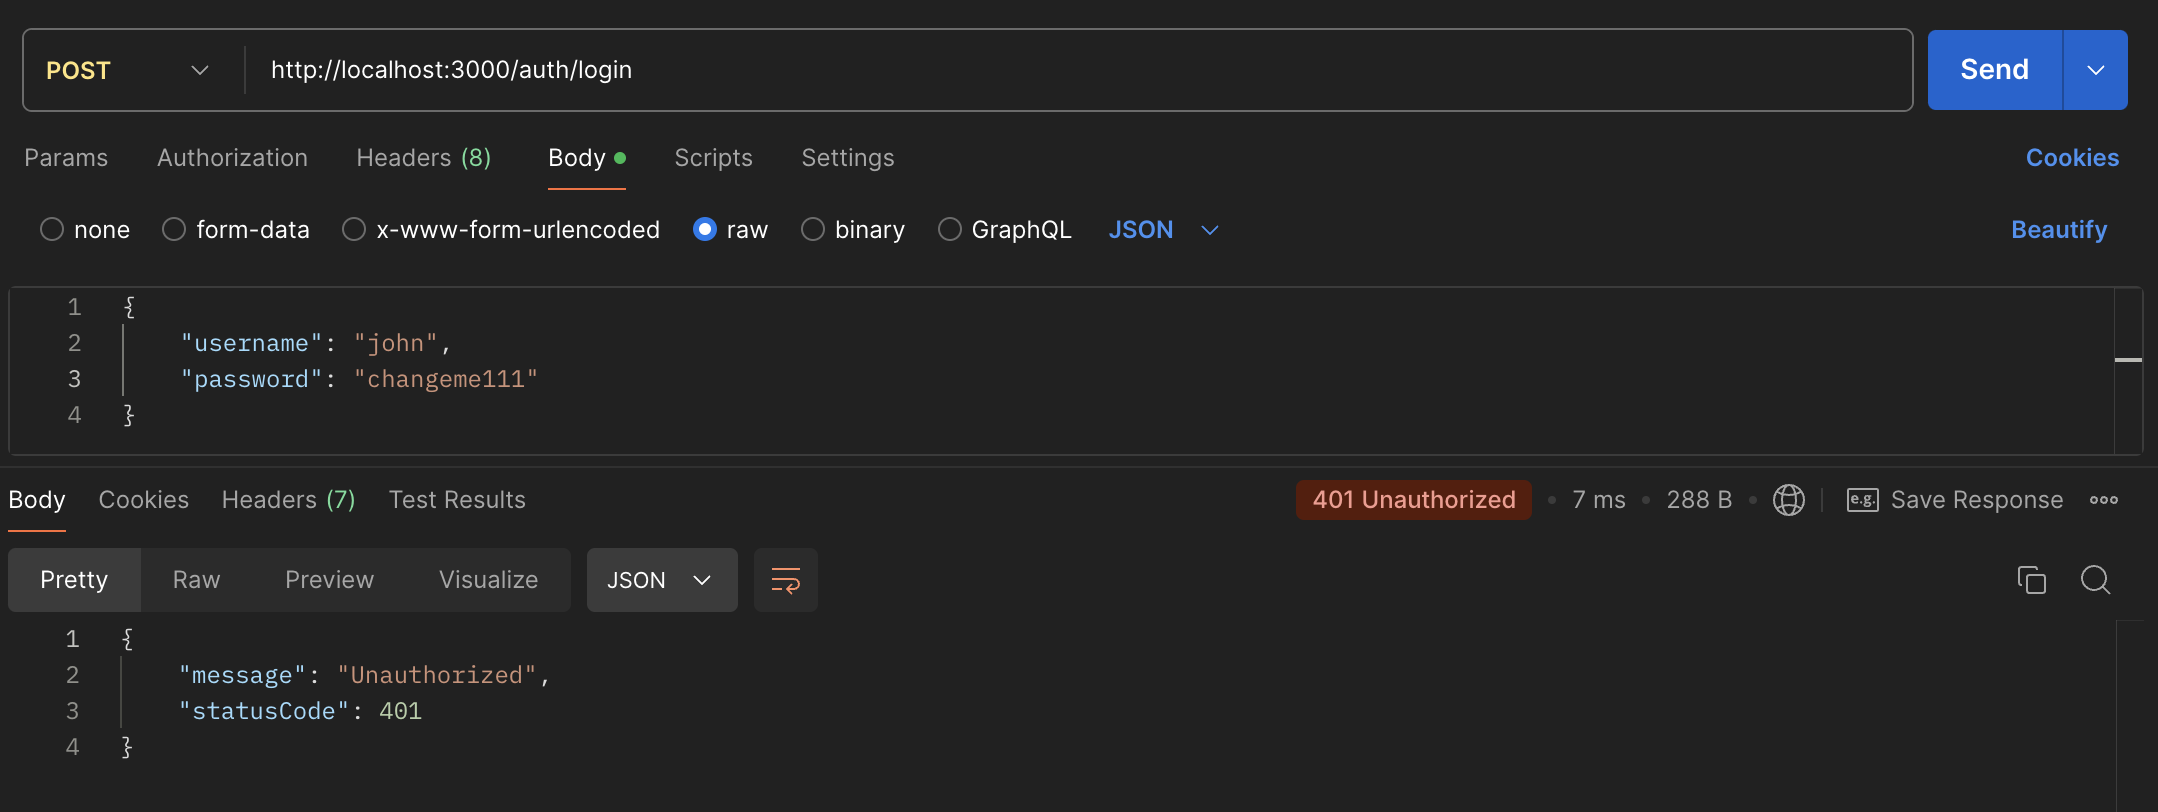
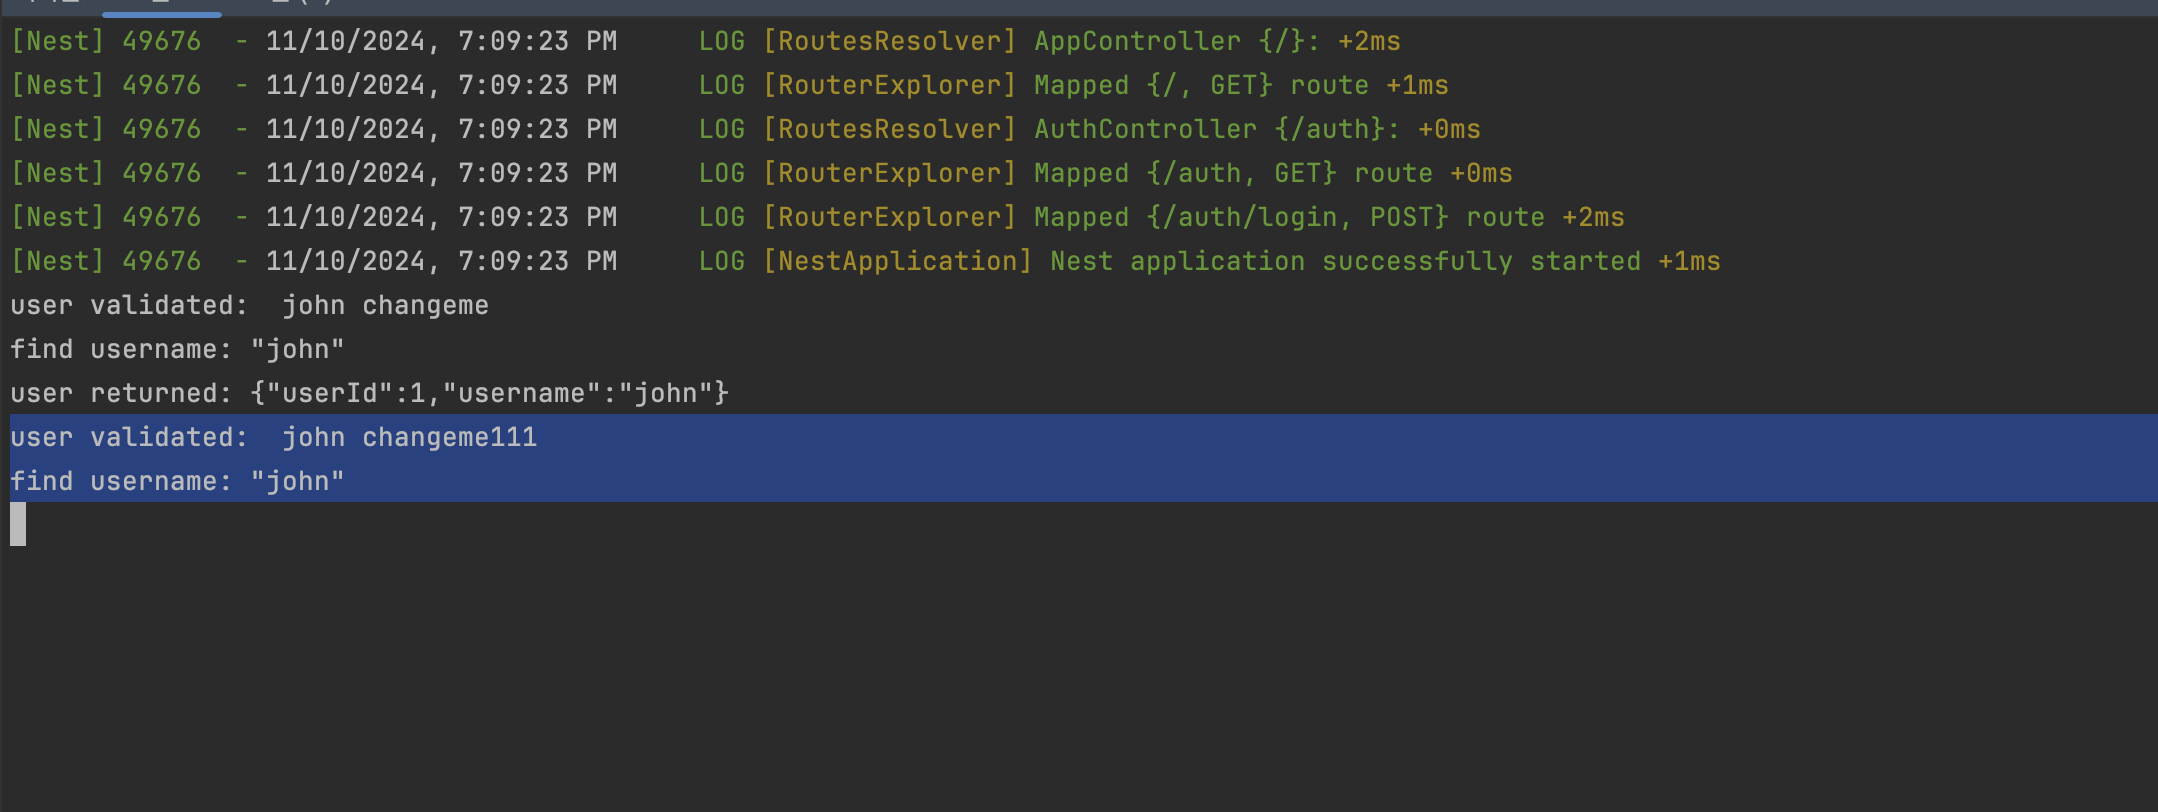
위 작성한 코드를 실행하였을 때 정상 작동하는 모습을 볼 수 있습니다.


실패 시에는 컨트롤러까지 가지 않고 그전에 예외처리되어 리턴됩니다.
5. 참고자료
https://docs.nestjs.com/recipes/passport
Documentation | NestJS - A progressive Node.js framework
Nest is a framework for building efficient, scalable Node.js server-side applications. It uses progressive JavaScript, is built with TypeScript and combines elements of OOP (Object Oriented Programming), FP (Functional Programming), and FRP (Functional Rea
docs.nestjs.com
'DEV > Node' 카테고리의 다른 글
| [Node] class-validator decorator 목록 (1) | 2024.11.18 |
|---|---|
| [Node] Custom Validate Decorator 적용하기 (with. NestJS) (1) | 2024.11.07 |
| [Node] NestJS 란? (0) | 2023.11.16 |
0. 개요
Passport.js란?
Passport.js는 다양한 인증 방법(예: 로컬 사용자명/비밀번호, OAuth, JWT 등)에 대한 전략을 제공하여 인증을 간소화하는 인기 있는 Node.js 미들웨어입니다. Passport.js의 모듈식 아키텍처는 Express와 같은 프레임워크, 그리고 이를 기반으로 하는 NestJS와의 원활한 통합을 지원합니다.
- 모듈식 전략 통합: 다양한 인증 전략을 필요에 따라 쉽게 전환할 수 있습니다.
- 커뮤니티 및 문서 지원: 강력한 커뮤니티 지원과 잘 정리된 문서.
- NestJS와의 자연스러운 호환성: NestJS의 모듈 구조에 자연스럽게 맞아떨어집니다.
Passport는 어떻게 동작하는가?
NestJS에서 Passport는 미들웨어로 작동하며, 다양한 인증 전략을 구현하는 데 사용됩니다. 각 전략은 Passport의 Strategy 클래스를 확장하여 정의됩니다. NestJS는 이를 통해 인증 로직을 관리하며, 요청이 들어오면 AuthGuard를 이용해 설정된 인증 전략이 실행됩니다. UseGuards 데코레이터를 사용하면 해당 경로에서 Passport 전략이 활성화되어 요청의 유효성을 검사합니다.
예를 들어, AuthGuard('local')은 로컬 전략을 사용하여 사용자의 자격 증명을 검증합니다. 이 가드는 Passport가 요청 객체에 사용자 인증 정보를 추가하도록 하며, 인증 성공 시 req.user에 사용자 정보가 포함됩니다.
간단하게 말하자면 아래와 같은 흐름을 가지면서 Strategy에서 반환한 값을 Controller에서 사용이 가능합니다.
Client -> { Guard -> Strategy(Passport) } -> Controller
1. 사전 준비
Passport 사용에 필요한 라이브러리 설치.
--save 옵션은 현재 생략해도 알아서 package.json 에 의존성 추가가 됩니다.
npm install --save @nestjs/passport passport passport-local
npm install --save-dev @types/passport-local
Class 파일 생성.
# user 관련 파일 세팅
nest g mo users
nest g s users --no-spec

# auth 관련 세팅
nest g mo auth
nest g s auth --no-spec
nest g co auth --no-spec
2. 구현
구현 예시는 공식 홈페이지를 참고하였습니다.
UsersService
import { Injectable } from '@nestjs/common';

// This should be a real class/interface representing a user entity
export type User = any;

@Injectable()
export class UsersService {
  private readonly users = [
    {
      userId: 1,
      username: 'john',
      password: 'changeme',
    },
    {
      userId: 2,
      username: 'maria',
      password: 'guess',
    },
  ];

  async findOne(username: string): Promise<User | undefined> {
    console.log(`find username: ${JSON.stringify(username)}`);
    return this.users.find((user) => user.username === username);
  }
}
User의 데이터 모음(대체로 Repository 역할)에서 username 값으로 찾는 메소드를 하나 추가가 되어있습니다.
UsersModule
import { Module } from '@nestjs/common';
import { UsersService } from './users.service';

@Module({
  providers: [UsersService],
  exports: [UsersService],
})
export class UsersModule {}
AuthService
import { Injectable } from '@nestjs/common';
import { UsersService } from '../users/users.service';

@Injectable()
export class AuthService {
  constructor(private usersService: UsersService) {}

  async validateUser(username: string, pass: string): Promise<any> {
    //TODO 검증에 있어 Password 는 텍스트로 바로 저장하지 않습니다. 보안 이슈가 있기 때문에 암호화 처리는 필수!
    const user = await this.usersService.findOne(username);
    if (user && user.password === pass) {
      const { password, ...result } = user;
      return result;
    }
    return null;
  }
}
예제 상에는 비밀번호 암호화 내용이 없지만 아래 쪽에 보면 암호화 및 검증을 하라는 말이 나와있습니다.
대부분 보안 상의 이슈로 비밀번호를 일반 텍스트로 저장하는게 아닌 Hash로 암호화하기 때문에 예제 상 간단하게 구성되어 있을 뿐 암호화 및 검증 로직이 추가되어야 합니다.
LocalStrategy
import { Strategy } from 'passport-local';
import { PassportStrategy } from '@nestjs/passport';
import { Injectable, UnauthorizedException } from '@nestjs/common';
import { AuthService } from './auth.service';

@Injectable()
export class LocalStrategy extends PassportStrategy(Strategy, 'local') { // Strategy 이름 지정이 가능함.
  constructor(private authService: AuthService) {
    super();
  }

  async validate(username: string, password: string): Promise<any> {
    console.log('user validated: ', username, password);
    const user = await this.authService.validateUser(username, password);
    if (!user) {
      throw new UnauthorizedException();
    }
    console.log(`user returned: ${JSON.stringify(user)}`);
    return user;
  }
}
Passport를 활용한 로그인 검증 전략을 작성하는 Class입니다.
위에서 작성한 AuthService의 validateUser() 메서드를 사용하고 예외처리가 적용됩니다.
통과 시에는 user 객체를 반환하여 다시 조회할 필요 없이 User의 정보를 사용이 가능합니다.
PassportStrategy 상속 시, name 파라메터에 지정을 해두면 자동 설정된 이름 대신 사용이 가능합니다.
(AuthGuard() 사용 시, 확인 가능)
AuthModule
import { Module } from '@nestjs/common';
import { AuthService } from './auth.service';
import { UsersModule } from '../users/users.module';
import { LocalStrategy } from './local.strategy';
import { PassportModule } from '@nestjs/passport';
import { AuthController } from './auth.controller';

@Module({
  imports: [UsersModule, PassportModule],
  providers: [AuthService, LocalStrategy],
  controllers: [AuthController],
})
export class AuthModule {}
AuthController
import { Controller, Get, Post, Req, UseGuards } from "@nestjs/common";
import { AuthGuard } from '@nestjs/passport';
import { Request } from 'express';

@Controller('auth')
export class AuthController {
  @Get()
  test() {
    return 'test api';
  }

  @UseGuards(AuthGuard('local'))
  @Post('login')
  async login(@Req() req: Request) {
    return req.user;
  }
}
컨트롤러를 정의할 때 사용 할 Guard를 적용해 넣게 됩니다.
이때 위에서 언급하였듯이 AuthGuard('local')처럼 'local' 대신 다른 명칭을 지정해서 사용이 가능합니다.
추후 jwt, google, kakao 등 추가적은 검증을 넣는다면 해당 명칭을 임의로 지정하여 사용하게 됩니다.
3. 실행
위 작성한 코드를 실행하였을 때 정상 작동하는 모습을 볼 수 있습니다.
실패 시에는 컨트롤러까지 가지 않고 그전에 예외처리되어 리턴됩니다.
5. 참고자료
https://docs.nestjs.com/recipes/passport
Documentation | NestJS - A progressive Node.js framework
Nest is a framework for building efficient, scalable Node.js server-side applications. It uses progressive JavaScript, is built with TypeScript and combines elements of OOP (Object Oriented Programming), FP (Functional Programming), and FRP (Functional Rea
docs.nestjs.com
'DEV > Node' 카테고리의 다른 글
| [Node] class-validator decorator 목록 (1) | 2024.11.18 |
|---|---|
| [Node] Custom Validate Decorator 적용하기 (with. NestJS) (1) | 2024.11.07 |
| [Node] NestJS 란? (0) | 2023.11.16 |